The Waterbutt Gauge - Fitting Instruction :
 To open/print a word.doc version of these instructions, please click here. The waterbutt gauge kit is really easy to fit. Please read the following before starting. Each gauge contains the following:
1 x Tank Fitting, O-Ring & Nut, UV Resistant PVC Tube, 1 x Tube Clip & Screw, 2 x White Floating Beads.
 Step 1. Empty your waterbutt. Work out the maximum height that the water will sit in the tank i.e. the level of your overflow. The pvc tube will need to be attached so that it is at least 5cm above the maximum water level . The tube can be cut to length later on if necessary.
Step 2. You will need to work out where you want to position the tank fitting. There are various options. Some people prefer to put the gauge to the side of the tap and some people just above it. The fitting does however need to be at least 6cm above the bottom of the tank to avoid silt blocking it up. Important: The fitting must be located in an area of the plastic that is as flat as possible i.e. not textured, on an uneven curve or on a seam. If your waterbutt is textured, you will need to find an area that is very smooth otherwise the o-ring will not be able to seal correctly and a small amount of water may drip out. Silicone sealant can however used if this occurs. Later you will need to reach inside the tank with long nosed pliers to attach the white nut, so make sure you can reach the final position.
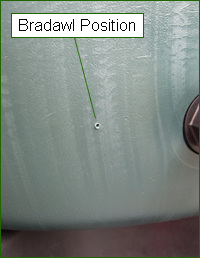
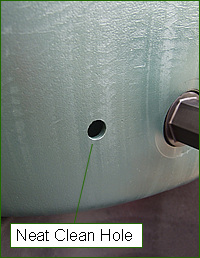
 Step 3. When you have worked out where the fitting will go, you will need to carefully drill a hole through the plastic. If possible, drill a test hole through the top of the waterbutt where it wraps back into the centre, hidden just under the lid to see how the plastic behaves when it is drilled. Important: The fitting is designed for a 10mm hole only. When you are confident you can drill a clean hole, move onto drilling the main hole. First make a small mark in the plastic where you want to drill with a bradawl for example. Make sure the bradawl doesn't slip. Lay the waterbutt on its side so it is horizontal and drill the hole in two stages, first with a sharp 5mm or 6mm drill and then with a sharp 10mm. Drill carefully (don't let the drill slip) and you don't want any plastic burrs or to tear the plastic. By drilling in two stages, these burrs are minimized. If any burs are created, carefully remove them. The outside surface must be clean and smooth. If you can, remove any burrs from the inside of the tank, so the nut fits evenly.
 Step 4. Push the fitting through the tank. The o-ring goes between the fitting face and the outside of the tank as supplied. The best way to attach the nut is with long nosed pliers. With the tank vertical, you will need an assistant to hold the fitting and turn it clockwise whilst you lean into the tank and hold the nut in position accurately with the pliers, in a similar way to that which most waterbutt taps are attached with a nut. Make sure the nut is aligned correctly, be careful not to cross thread the plastic nut, although the fitting is designed to help avoid this happening. Release the grip on the nut whilst your assistant turns the fitting to check the nut is rotating evenly once the nut has taken a few turns (a torch may help see the nut). When you are happy the nut is aligned correctly, gently tighten the nut. Important: There is no need to tighten the fitting more than finger tight. Indeed, if it is tightened more than finger tight, damage to the fitting will occur. Also, over tightening can cause the O-ring to push out of the central position. If this occurs slacken the nut and re-tighten, reducing the amount of force on the nut. The final position of the barb needs to be vertical. You may need to slacken the nut slightly to achieve a vertical position. The nut does not need to be very tight at all.
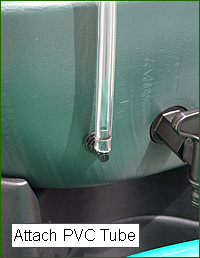
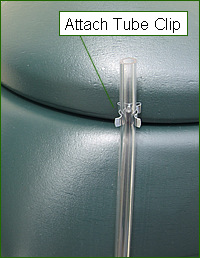 Step 5. Now the fitting is attached, carefully push on the pvc tube. You can warm the end of the tube in hot water to help it slide on if necessary. Hold it vertically and work out where the tube clip will be located. This ideally needs to be above the maximum waterline as a screw holds it in position. The clip can be located on the lid or just under it. If the clip needs to be located below the maximum waterline, and it does leak slightly, you could put some sealant around the screw. Drill a very small hole or use a fine bradawl to allow the screw to tighten the clip to the tank. Push the tube into the clip. The tube length can be shortened if required by cutting it with sharp scissors for example.
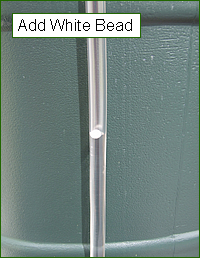 Step 6. Finally, drop the white floating bead into the tube. As the water rises and falls, the bead will follow the water level, clearly marking the position of the water inside the tank. A spare bead is supplied should it be required.
No problems have been reported with the installation of the fitting. If however the fitting should ever show signs of very slight leaking, you may need to put some sealant around the thread and o-ring.
The gauge has been tested in freezing conditions without issue, however it is recommended that waterbutts are emptied before a heavy frost or during periods of severe weather to avoid expansion damage. Service parts are available on request. Please contact us via email.
We hope that the gauge serves you for many years and becomes a valuable addition to your water management.